How to add a display image (or featured image) to an activity
In this article you can find information about:
Display options
There some different display types for activity listings on your homepage that include an image for each activity.
These include the option to have any list arranged as tiles displaying a large rectangular image, stacked one, two or three to a row when viewed on a desktop.

Or long bars with a square image at one end of the bar:

Or slightly narrower bars with a smaller image at the other end of the bar:

If you'd like to discuss using one of these display types on your homepage, please contact your customer success manager.
What image will display for my activity?
For any listing that includes images, it uses the following:
- A featured image - keep reading for instructions on how to add a featured image.
- If there is no featured image but there is a activity specific banner image (uploaded via Manage Theme), Citizen Space will use that image. It will never use the site-wide banner image as this would look repetitive if displayed for multiple activities.
- If there is no featured image and no activity specific banner image, it will show a coloured box using the brand colour of your organisation.
How to add a featured image to an activity - Site Admins only
Please note that only admins with Site Admin permission can add a featured image to an activity, so if you're a Department Admin, Individual Admin or Analyst, you'll need to ask a colleague with Site Admin permission to upload the image for you.
Adding an image to an activity to display on the homepage is exactly the same as adding an image to a featured activity. If you are a Site Admin, follow these instructions:
Adding an image to an activity to display on the homepage is exactly the same as adding an image to a featured activity. If you are a Site Admin, follow these instructions:
-
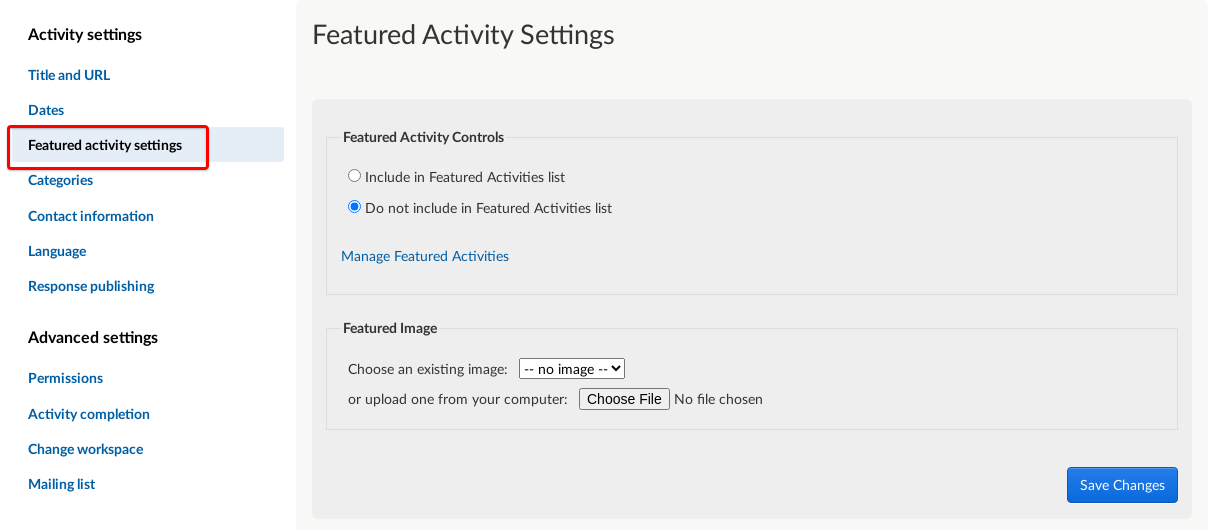
Go to the activity dashboard, and at the top of the dashboard, go to the dropdown menu 'Design and build' and select 'Settings'. From the menu on the left-hand side of the page, select 'Featured activity settings'.

-
The section under the second heading,'Featured Image', allows you to add a display image to the activity.

You can either:
- use the dropdown menu to choose from existing images which have been uploaded to the activity, such as any images which have been embedded on the overview or survey pages; or
- use the button to browse for and upload a new image from your computer/device.
Once you've uploaded a new image and selected the blue 'Save changes' button, the image will be resized and cropped as necessary to fit the available space. You'll see a preview of how the image may be displayed, but it will automatically look different on different screen sizes. Please note that the middle part of the image is the part that will most often be visible.
Refer to our article on 'How do I make images look great in Citizen Space' for more advice on choosing the best image for this space. It's possible to preview the image on both desktop and mobile.
Now head over to your Citizen Space homepage to see how your activity image appears.
.png)