How do I add and edit Skip Logic rules?
Skip Logic, also known as activity routing or branching, allows you to change the way a respondent progresses through your activity, depending on their answer to particular questions, on a page-by-page basis.
Before you start adding skip logic rules, make sure you have added all pages and questions to your activity, decided which questions will be used to control conditional skip logic, and planned the possible routes through the activity.
You can make changes after you've added skip logic rules, but any changes may impact routing. For an overview of skip logic and hints on how to plan your activity please read How do I design an activity with skip logic?.
Be very cautious when deleting and moving questions and pages that have skip logic rules set to them. Best practice is to remove the skip logic rule first and then delete/move the question as required.
In this article we’ll discuss the following:
- The Skip Logic Settings page
- Adding a Skip Logic Rule
- Setting Skip Logic Rules for Multiple Pages at Once
- Reviewing and Editing your Skip Logic Rules
- Testing your Rules
The Skip Logic Settings page
At any time while editing your activity, you can access the Skip Logic Settings page via the Build activity page, where Skip logic settings will appear on the sidebar. This can be accessed via Design and build from the dashboard.
Note that only linear activities support skip logic. Any skip logic rules applied to non-linear activities will be ignored.

The Skip Logic Settings page gives you an overview of the possible routes through the activity. On a newly-created activity without any skip logic rules, this page shows that all respondents proceed through each page in sequence from the Introduction page through to the end of the activity.
Adding a Skip Logic Rule
To add a skip logic rule, first make sure the button marked 'Edit Skip Logic Rules Individually' is selected.

Refer back to your activity plan to work out which pages will need skip logic rules, then select the 'Add Skip Logic' link in the grey box corresponding to the relevant page. Citizen Space will then guide you through adding a skip logic rule as a series of steps.
You should always move respondents forward through your survey. Moving respondents back to an earlier page may cause them to lose the answers they have put in so far, or create an infinite loop.
Step 1: choose a rule type
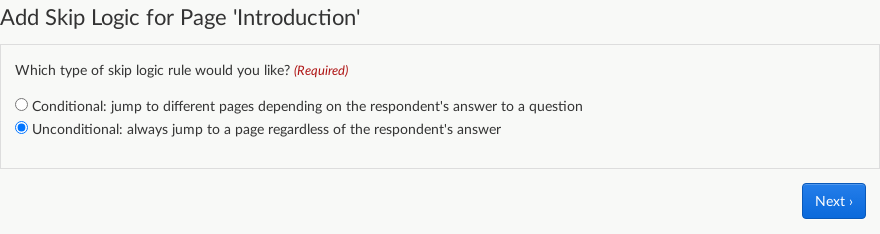
Refer to your activity plan to establish whether you need to add a conditional or unconditional rule. If the current page does not contain any suitable questions on which to base conditional rules, then the option to add a conditional rule will be disabled. Select 'Next' to continue adding your skip logic rule.
Step 2 (Unconditional skip logic): choose your destination

If you chose to add an unconditional rule, the final step is to choose where you should jump to. Select the destination page from the dropdown list, and select 'Finish'. You will be taken back to the Skip Logic Settings page.
Step 2 (Conditional skip logic): choose your conditional question

If you chose to add a conditional logic rule, the next step is to choose which question should be used to determine the respondent's next steps through the survey. The dropdown list will include all question components on the current page that are suitable for use with conditional skip logic rules. Select the required question component and select 'Next'.
Step 3 (Conditional skip logic): choose your destinations

For conditional skip logic rules, the final step is to choose the destination page for each possible answer to your chosen routing question. You can choose the same destination page for more than one answer if required (see the 'walking' and 'cycling' examples above).
You should also choose a destination for the case where the respondent chooses not to answer the question. This is still necessary even if the question is set as 'required'. This helps to provide a safe fallback option if, for example, the question is edited after the conditional rule has been set up.
Click 'Finish'. You will be taken back to the Skip Logic Settings page.
Setting Skip Logic Rules for Multiple Pages at Once
In some circumstances you will have several pages that should jump to the same destination page when submitted. This often happens when you have several conditional branches that all need to resolve to a general 'Thank you' page at the end of the survey. In the case of our example activity, there are three branches for different commuting methods: walking/cycling, private vehicles and public transport. After finishing any of these branches, the respondent should be taken to the "General commuting questions" page.
To achieve this, you could add an unconditional rule to each of these pages as described in the previous section. Alternatively, you can select the button labelled 'Set Destination for Multiple Pages at Once' at the top of the Skip Logic Settings page.

In this mode, you can tick the boxes next to the relevant pages, then scroll to the bottom and select the destination page from the dropdown list. Once you select "Submit" this will automatically add an unconditional rule to each of the selected pages, redirecting them to the chosen destination. This will replace any conditional or unconditional rules that had previously been applied to these pages.
Hint: you can also use this mode to remove skip logic from several pages at once, by choosing 'Next page in survey (no skip logic)' as the destination.
Reviewing and Editing your Skip Logic Rules
Once you have added skip logic rules, the Skip Logic Settings page provides an overview of how respondents will move through the survey:
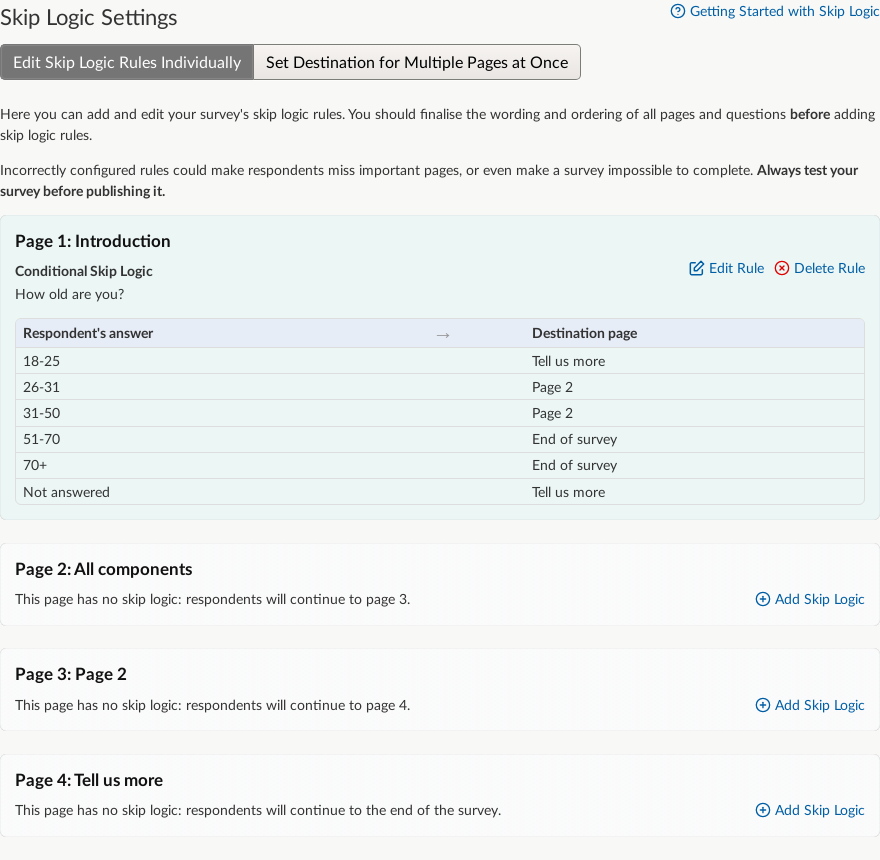
Boxes are highlighted in blue to represent pages with skip logic rules. In these boxes, 'Edit Rule' and 'Delete Rule' links have replaced the 'Add Skip Logic' link. Deleting a rule restores the page to its default behaviour, which is to continue straight onto the next page in the survey. Editing a rule follows the same steps as the section 'Adding a Skip Logic Rule' above.
Testing your Rules
Before publishing you should always test your activity in preview mode. Try every possible answer to your conditional logic question(s), and make sure that in each case, the route through the activity makes sense and includes all the necessary pages.
Important note: Skip logic is an advanced feature. Incorrectly configured rules could make respondents miss important pages, or even create an infinite loop that would prevent respondents from completing and submitting the survey. Always test your survey before publishing it!