Setting up response publishing
This article explains how to set up survey responses to be published using the response publishing feature. Please speak to your customer success manager if you do not have response publishing enabled on your Citizen Space site and are interested in learning more about it.
Response publishing is available as a feature on Survey and Form activity types.
The first thing to do when setting up an activity with response publishing is to create the activity (either a Survey or Form) and add a consent question. Once that is done you can crack on with deciding which questions will be published.
Setting up response publishing can be done in 3 easy steps:
- Step 1: Turn on response publishing
- Step 2: Set the consent question
- Step 3: Set what questions get published
Step 1: Turn on response publishing
To turn on publishing for a particular activity, once your consent question has been set up, at the top of the dashboard go to the dropdown menu Responses and select 'Response publishing':
...and then toggle the radio buttons to switch on response publishing:
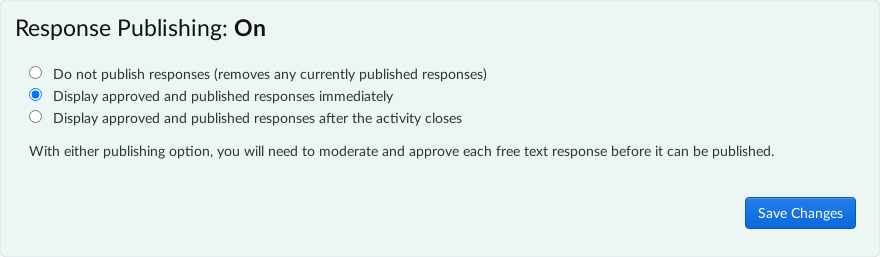
When setting up response publishing you have the option to either:
- Display published responses immediately which enables approved responses to be publicly visible while the activity is still open and collecting responses. Please note that the response must still be moderated, approved and published by the administrator before it can be published.
- Display published responses after the activity closes which enables approved responses to be publicly visible after the activity is closed.
You may turn off response publishing by selecting Do not publish responses. Responses that may have been previously published will no longer be visible to the public.
It is worth noting that both options to publish require the submission to be moderated and approved by the administrator before the response is published.
The option which is most suitable will depend on your requirements, and whether you want people to be able to read other respondents' submissions before submitting their own (which may influence what they write).
Choosing 'Display published responses immediately' might be preferable if you're using Citizen Space to run ongoing, generic surveys. For example, these could be internal feedback forms, or standardised 'customer experience' surveys.
If you're running a longer-term activity, it's useful for the administrator to be able to publish responses while the activity is still open.
Step 2: Set the consent question
The consent question must have a radio button or single checkbox answer component.
Once you have created your consent question and turned response publishing on, you'll see the Set up consent question button.
Within the dropdown list you will see all of the questions in your activity which have a radio button or single checkbox answer component. Select the question you added as the consent question.
This list will show both the question and reporting field headings you entered when setting up your survey — you need to select the reporting field heading. In the example below, the reporting field heading for the consent question is 'Response publishing'.

If you have not yet included a consent question, add one to your survey and return to set up the question following the above steps.
Step 3: Set what questions get published
The default setting for all questions when you first set up the response publishing on each activity is Don't publish.
To allow publishing of questions, stay on the Response publishing settings page, scroll down and you will see a table.
The left hand side of the table lists all the headings of answer components which can be published.
At the top of this table you will see Consent Answer and the answers to the consent question.
You must manually change the publishing settings for each answer component. Remember to reflect what you've outlined in the consent question.
Under Consent Answer, you can see the answers to the consent question.
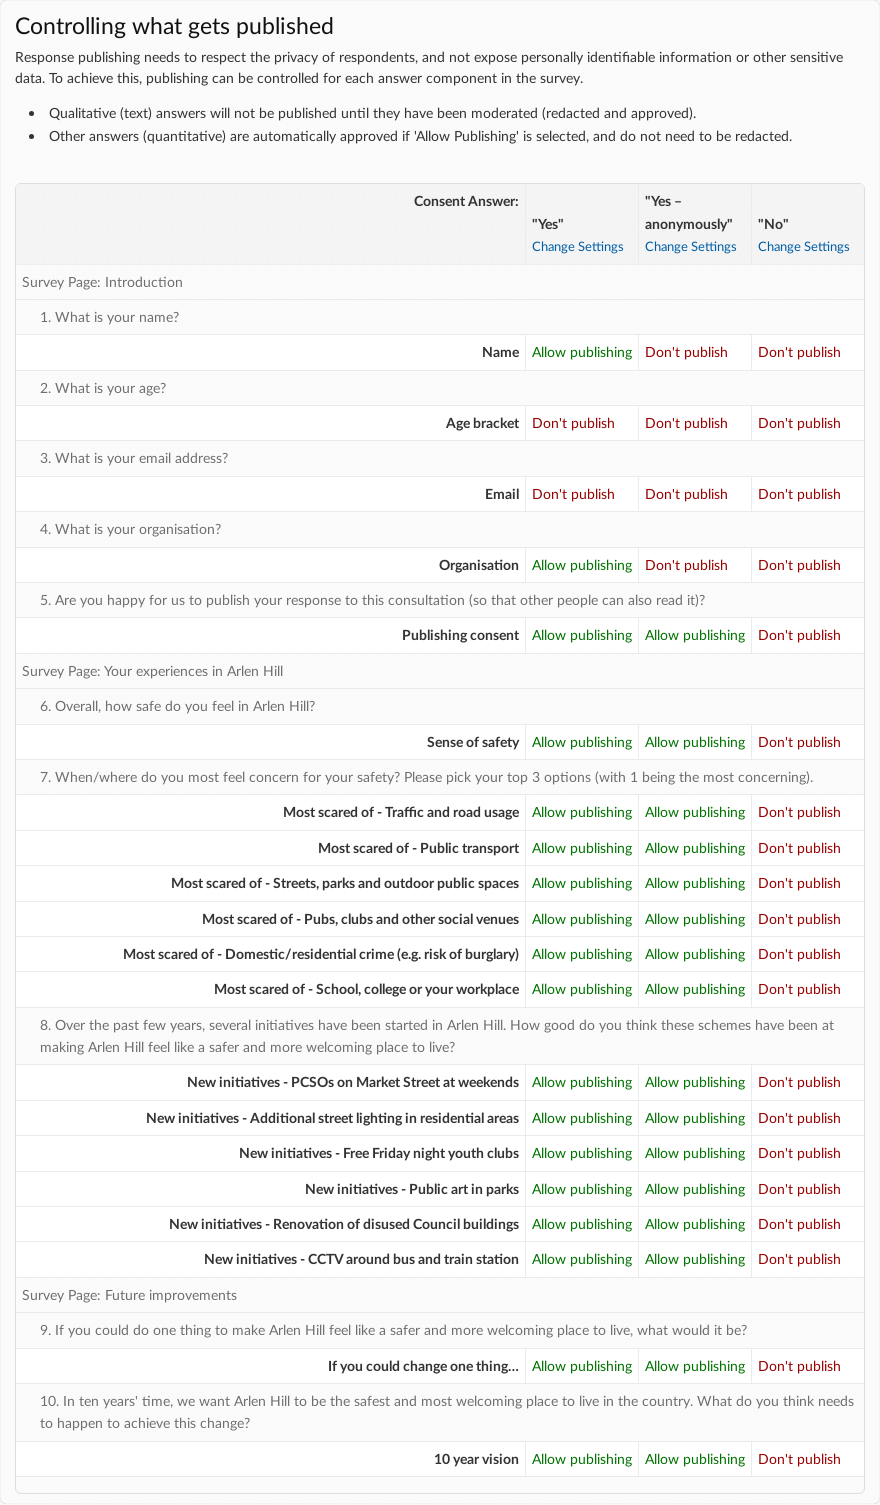
How to set questions to be published
To change if an answer can be published or not, click on Change Settings under each answer. You can then toggle between 'Don't publish' or 'Allow publishing' depending on the answer component.
Top user tip: If you've got tons of publishing permissions to change, use 'TAB and the down arrow ↓' - it is way faster than clicking!
You may wish to have an option to the consent radio question which allows a user to opt-out of publishing completely, so the Don't Publish Any column for that respondent would be selected.
Select the Save Changes button, and return to the main table via the General settings link at the top of the table.
And now you're all set for publishing responses!
It is worth bearing in mind how qualitative and quantitative answer components work with response publishing:
- Qualitative (free text) responses which are allowed to be published must be moderated and approved before eventually being published.
- Quantitative (multiple choice, check box, radio buttons) are automatically approved and do not require redaction.
- Publishable replies (an analyst-only single line text or multi-line text set to be publicly published) follow the same moderation and approval process as other qualitative responses - find out more about publishable replies.
- File uploads (e.g. if you gave respondents the opportunity to provide supporting documents via a file upload component) must also be moderated but via a different moderation process - you can read more publishable file uploads.
Once your activity is open and responses have been submitted, you may begin the process of moderation and redaction. Please read this article on moderation and redaction to guide you through this process.