Citizen Space Admin Single Sign-on (SSO) - help and support for organisations
This article is for the Citizen Space Admin SSO feature. Please contact your Customer Success Manager if you are interested in using Single Sign-on and Citizen Space.
Citizen Space Admin SSO allows you to connect your identity provider to your Citizen Space site so that admin users can sign in with their existing identity provider credentials.
Important Notes Before You Begin
Test it - SSO configuration affects user access to your Citizen Space site. We strongly recommend thoroughly testing the setup with a small group before rolling out to all users.
Emergency access - Before enforcing SSO for your organisation's email domain, create one Site Admin 'emergency' account with an email address on a different domain. This allows the emergency account to log in with a username and password if SSO configuration issues arise.
Article sections:
- Overview
- Responsibility Matrix
- Configure Admin SSO with Microsoft Entra ID
- Enforcing SSO for certain users
- Additional Resources
Overview
- Citizen Space Admin SSO is an authentication method only. Users are still required to have a valid Citizen Space account which controls their roles and permissions within Citizen Space.
- Citizen Space Admin SSO is provided using the OpenID Connect (OIDC) protocol. It uses Authorization Code Flow with Proof Key for Code Exchange (PKCE).
- You can only set up one identity provider with your Citizen Space site.
Responsibility Matrix
What your IT team does (Steps 1-3)
- Configure the Entra ID application
- Configure Citizen Space SSO settings
- Grant admin consent (optional but recommended)
- Test the connection
What individual users must do (Step 4)
- Each user must manually link their own Citizen Space account to their Entra ID account
- Site administrators cannot perform this linking on behalf of users
What happens for end users
- During setup (Steps 1-3): No visible changes for end users
- After complete setup: Users will see a 'Log in with Single Sign-on' option on the login page
After linking accounts: Users can choose to log in via SSO or traditional username/password.
To configure Admin SSO, you will need:
- a Site Admin account on your Citizen Space site.
- Administrative privileges in your identity provider.
Configure Admin SSO with Microsoft Entra ID
Citizen Space is designed to integrate with any identity provider which supports the OpenID Connect protocol. Specific instructions for setting up Microsoft Entra ID are provided below:
Please note: As Citizen Space has a single-tenant deployment model, it is not available as an Entra ID gallery app. You'll need to set up a new Entra ID app registration which supports a one-to-one connection between your Entra ID database and your Citizen Space site.
Step 1: Add the Citizen Space SSO application to Entra ID
Responsibility: Your IT Administrator
- Sign in to your account on the Microsoft Entra Admin Centre.
-
Go to Entra ID, select App registrations, and then select New registration.

- Enter a name for your application (Most customers use 'Citizen Space' for their application name).
- Under Supported account types ensure that Accounts in this organizational directory only is selected.
-
Under Redirect URI select the Web option. Leave the URL field blank for now.

- Select Register.
You'll be taken to an overview screen with details of the application you just created. You'll need these details for Step 2.

Step 2: Configure your Citizen Space site
Responsibility: Your IT Administrator
Important: Completing this step does not cause any visible changes for end users. The SSO login option will only appear after all configuration steps are complete and users have linked their accounts.
- Open a new browser tab or window and log in to your Citizen Space site.
-
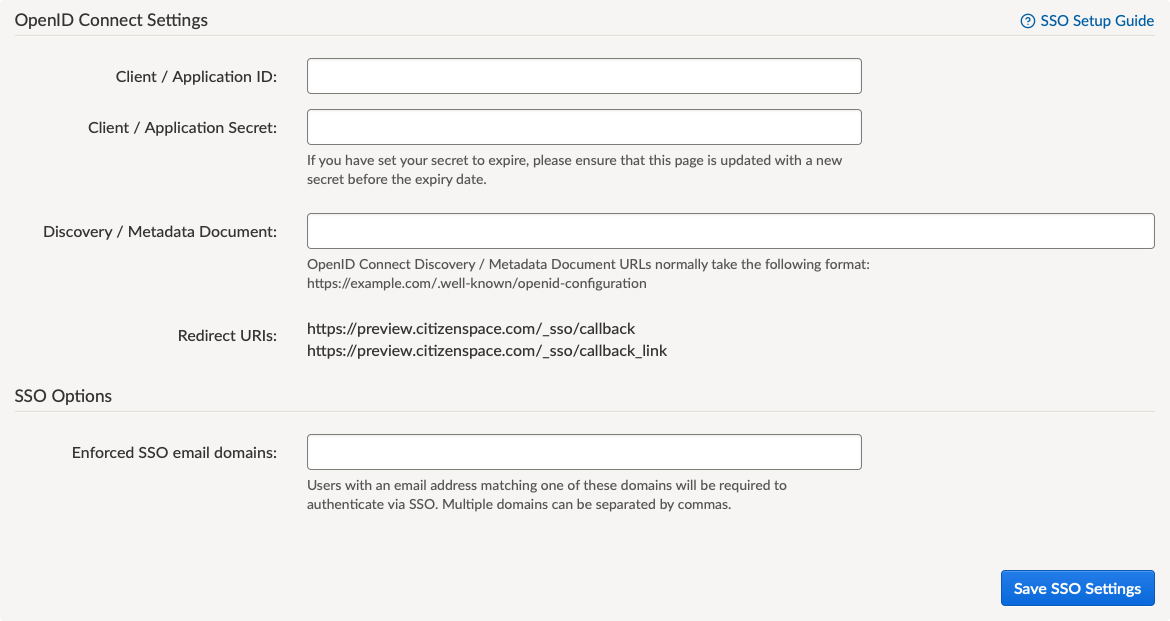
Load the SSO configuration screen at https://yourcitizenspacesite/_admin/sso_settings

- Complete the fields as follows:
-
Client / Application ID: Found on the Entra ID application overview screen

-
Discovery / Metadata document: Found via the Endpoints tab of the Entra ID application overview screen (labelled 'OpenID Connect metadata document')

-
Client / Application Secret: First, you need to create a new client secret under the Entra ID Certificates & Secrets submenu. To do so, select 'New client secret'. Give your Secret a description (such as Citizen Space). Choose when this expires and select Add. You will see your Secret ID. Save this Secret ID in a secure location, ideally in a Password Manager Vault.
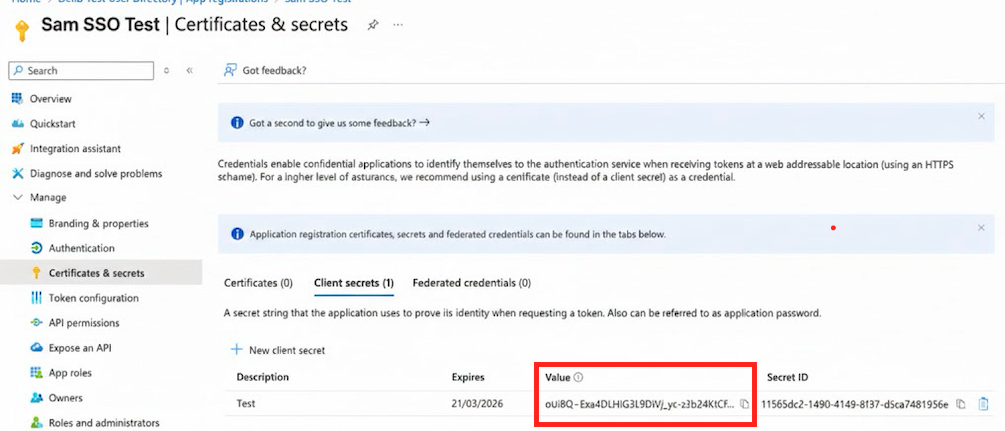
Then enter this Secret Value into the Client / Application Secret field on the Citizen Space SSO settings page.
-
-
Select Save SSO Settings.
After saving the Citizen Space SSO settings you'll see two Redirect URIs generated by Citizen Space. Copy these - you'll need them for Step 3.

Step 3: Configure the Entra ID Citizen Space SSO application
Responsibility: Your IT Administrator
- In the Entra ID sidebar select Authentication.
-
Select Add a Platform Web, then select Redirect URIs heading, copy and paste both Redirect URIs from the Citizen Space SSO configuration screen.

- Leave other redirect URI options unchecked.
- Select Save.
Step 3b: Grant admin consent for Entra ID Citizen Space SSO application (Optional, recommended)
Responsibility: Your IT Administrator
What this does: By default, each user will see a permission request popup the first time they log in using SSO, asking them to allow Citizen Space to access their basic profile information. Granting admin consent removes this popup for all users in your organisation.
To grant admin consent:
- Select API permissions in the Entra ID sidebar.
- Select Grant admin consent for <user directory>.
-
Follow the Entra ID prompts to grant admin consent for the Citizen Space application.

- Once admin consent is granted, you'll see a 'User.Read' permission listed with a green checkmark.
Step 4: User account linking (required for each User)
Responsibility: Individual Users
Important: This step must be completed by each individual user. Site administrators cannot perform this linking on behalf of users.
Each user who wants to use SSO must:
- Navigate to their Citizen Space user profile (link under their name in the toolbar).
- Select the Activate SSO link on their user profile.
- Select the Link Account button on the confirmation page.
- Complete the Microsoft login process when redirected.
- Confirm the success message that their accounts have been linked.
What users will experience:
- They'll be redirected to the Microsoft login page.
- After entering their Entra ID credentials, they'll be redirected back to Citizen Space.
- They'll see a confirmation message that their accounts are now linked.
Step 5: Using SSO to log in to Citizen Space
Once accounts are linked, users can log in using SSO:
- From the Citizen Space login screen, select Log in with Single Sign-on.
- Enter Entra ID credentials when redirected to Microsoft login page.
- Get redirected back to Citizen Space and be automatically logged in.
Note: Users can still choose to log in with their traditional username and password if they prefer.
Enforcing SSO for certain users
Once you have successfully configured Admin SSO, you can require users with specific email domains to use SSO:
- Log in to your Citizen Space site as a Site Admin.
- Load the SSO configuration screen at https://yourcitizenspacesite/_admin/sso_settings.
-
Enter one or more comma-separated domains in the Enforced SSO email domains field.

- Select Save SSO Settings.
What happens: Users with email addresses matching the specified domains will be required to log in via SSO. Existing non-SSO users will receive an email with activation instructions the next time they try to log in.
Additional Resources
- SSO Setup Video Demonstration - 15-minute walkthrough of the setup process
- User Guide: How to Link Your Account - Instructions for individual users