Quick start user guide to Citizen Space
This Citizen Space quick start guide offers an overview of the key things you need to know about Citizen Space in order to get your first activity online.
This guide is by no means exhaustive. It includes links to more information where appropriate.
Building an activity in Citizen Space, a quick start guide
So you have been asked to create an activity in Citizen Space, but you may have never used Citizen Space before. Don't worry! This quick start guide will walk you through the basic steps of building an activity in Citizen Space.
You can also check if we have any upcoming training sessions (opens in new tab) that you may benefit from attending.
Look out for the yellow blocks! Each one contains links to more detailed instructions and information on a given topic in the rest of this online Knowledge Base.
Where to start
Building an effective activity is a bit like writing a mystery novel: you should start with the end and work backwards. In other words, before you even log in to Citizen Space, it is a good idea to have a clear sense of what you want to end up with. Citizen Space is a very powerful and flexible system with a lot of options and possibilities. That means you will benefit from having a clear picture in your head (or on a piece of paper) of the activity you are trying to create and the desired outcome of that activity before you start.
We have an article about the thinking work you should do before you start.
Login to the admin side
First, log in to your Citizen Space admin area.
Having trouble logging in? Check the steps here: how do I log in to Citizen Space?
After logging in, you can start to look at the following:
- Create an activity
- Build the activity
- Pages, Questions and Answer Components
- Repeat as required
- About activity structure
- Publish
Creating an activity
Add an activity
The admin area is where you can manage all the different components of your Citizen Space. For now though, we're only interested in creating an activity. If you're not on the Manage Activities screen already, select Manage Activities.
The all-important Add Activity button is on the Manage Activities page.

Setting up your activity
The Add Activity screen is where you set up the initial, essential components of your activity.
In the first field, you need to give your activity a meaningful, but concise title. You have the option to edit this title later in the activity build process, so you can start building your activity even with only a working title if necessary.
Next you'll need to select the Workspace that the activity will exist within. If you are a site admin or a member of multiple Workspaces, these will be displayed in the dropdown menu for you to choose the appropriate one. If you are a member of only one Workspace, all your new activities will default to this Workspace. (If you need to create an activity within a Workspace which you are not already a member of, please contact your site admin of the relevant Workspace admin to be added to this Workspace before you proceed.)
Next you have the option to edit the last part of the URL, the URL pathname. By default this will be the same as the activity title you have just assigned (so, for example, an activity called 'My first activity' would have the URL pathname 'my-first-activity'), but you have the option to edit this now. As with the title, you can edit this later too.
Lastly on the Add Activity page, you'll need to select the activity type you wish to use for your activity. Your activity type options may vary depending on your organisation's Citizen Space subscription package but the standard activity types available to all users are:
- Consultation
- Form
- Survey
- Event registration (online)
- Event registration (in person)
- Call to action page
Once you have chosen your activity type, select the blue Add Activity button to access you activity dashboard.
Activity types? Not sure what all the activity type options mean? Learn more about the different activity types.
Activity URL? Get the lowdown on editing your URLs.
Activity build
You will now be at the Activity Dashboard screen. This is where you can access everything you need to build, edit, theme, monitor and analyse this particular activity. The contents and layout of your activity dashboard will vary depending on the activity type you have selected when adding your activity, but there are some features and functions common to all types.
The navigation bar of the dashboard contains the Workspace name, the activity type and the visibility (either public or private) of your activity, and the activity name itself. In the navigation bar there are also two widgets: Preview and Draft
The Preview widget is in two parts: the first opens the activity in Preview mode, allowing you to check and review your work prior to publication. The second part is a dropdown menu which provides another way to access preview mode and means to create and share a preview link.
At this stage, the Draft widget will be coloured orange and will display a little warning triangle alongside the word Draft. The warning triangle indicates that certain essential parts of the activity build are not yet complete, and selecting this widget opens a dialogue box explaining that you cannot yet publish or retract your activity for this reason and listing those incomplete tasks.
In the Activity's navigation bar you can access:
- A Dashboard button which will always take you back to the screen you are currently looking at
- The Design and build button to open the dropdown menu allowing you to build, theme and configure your activity
- For activities that will receive responses (forms, surveys, and event registration activities but not calls to action) you can also access the Responses button to open the dropdown menu allowing you to view, analyse, export and manually add to your responses.
Complete required settings
Using the Draft button dropdown menu will take you directly to the pages you need to complete in order to be able to publish. All of these pages are also accessible via the Design and build dropdown menu. For most activity types these required tasks are:
- Add overview text: This takes you to the Build activity page from where you can write your activity's overview text. (There is a more detailed description of this below.)
- Categorise this activity: This takes you to the Categories and tags section of the Activity settings, where you can assign relevant Areas, Audience and Interests to your activity. (Note: This only applies to site's that have Areas, Audiences and Interests activated.)
- Add dates: This takes you to the Dates section of the Activity settings, where you can set the Start and End date of your activity and also add optional expected dates of results and feedback. (N.B. This step is not required on sites that have made start and end dates optional.)
- Add contact information: This takes you to the Contact information section of the Activity settings, where you will need to provide at minimum a telephone number or an email address for an individual or team who are responsible for the activity and who can be contacted by respondents who have questions about it.
As soon as you have completed all these required tasks, the Draft widget in the Activity navigation bar will turn from orange to pale blue and the triangular warning sign will have changed into a circular info symbol. Selecting this will now advise you that your activity is Unpublished and also give you access tot he green Publish widget.
But your activity probably still needs some content, so let's take a closer look at the Design and build dropdown menu.
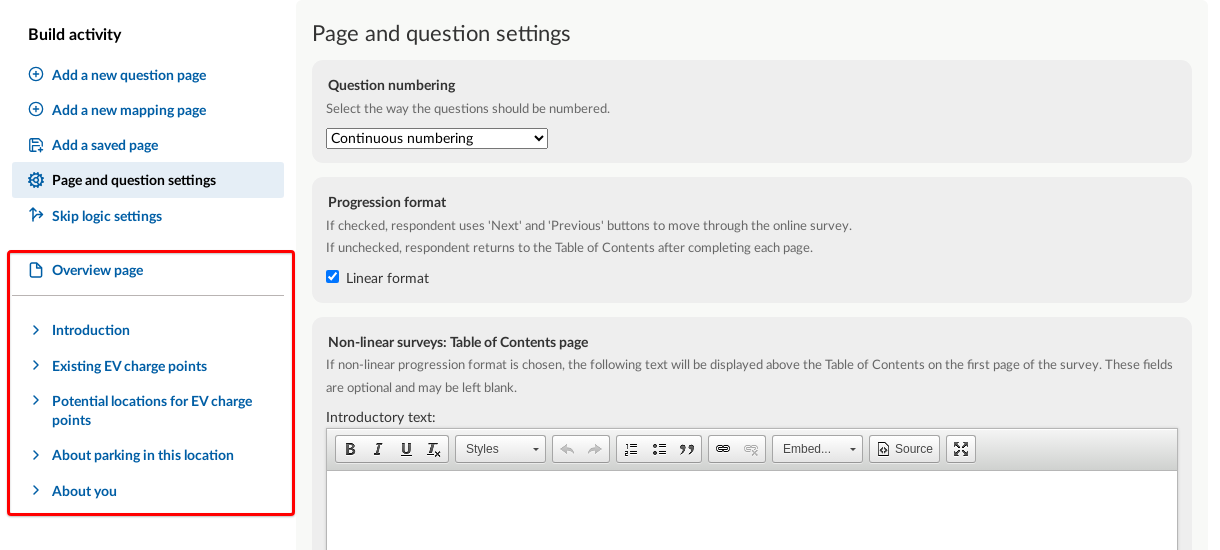
Design and build
The first option in the Design and build dropdown takes you to the Build activity screen. On the the screen there is also a sidebar menu of options:
- Add a new questions page
- Add a new mapping page (Geospatial customers only)
- Add a saved page
- Page and question settings
- Skip logic settings
- Followed by the list of the pages in your activity. At this point your activity will have only two pages: The Overview and Page 1. (Note: Page 1 of Event registration activities is called Contact information, while call-to-action activities include only Overview and no further pages.)
The first thing to do here is set up your activity's Overview. All activities require at least some information to be added to the Overview, and this is your opportunity to explain to your potential respondents exactly what your activity is all about and why you are doing it. (Survey activities also feature an additional, optional box allowing you to explain to respondents why it's important they take part in your activity.)
You also have the option to customise the call to action box that appears beneath your Overview description by adding an optional call to action heading and editing the link text. Some link text is required, as without any text there can be no link and without a link there is no way for respondents to access you activity!
(Call to action activities are designed not to link to further Citizen Space activities, but to include more detailed information and possibly links to external resources or events. For this reason, the call to action field for these activities is not a line of link text but a text-entry field with a full text editor bar, just like the one used to add the Overview description.)
Once you have added your activity description and made any other changes you wish to the Overview, select the blue Save button. Congratulations! you have completed the first of the essential tasks required to publish your activity!
Staying on the Build activity page, this is where you will build all the content of your form, survey and event registration activities, by adding new or saved pages (more on this below) . It is also where you will access your Page and question settings. These include Question numbering, Progression format (linear or non-linear structure), the non-linear-specific content (the Table of Contents page), the activity completion message, and the email acknowledgement message. It is also where you will access the Skip logic settings.
(Again, call to action activities are the odd ones out here. The options available to you from the Build activity screen of a call to action activity are identical to those available from the Design and build dropdown menu: Build activity itself; Manage theme; Related content; Events; and Settings.)
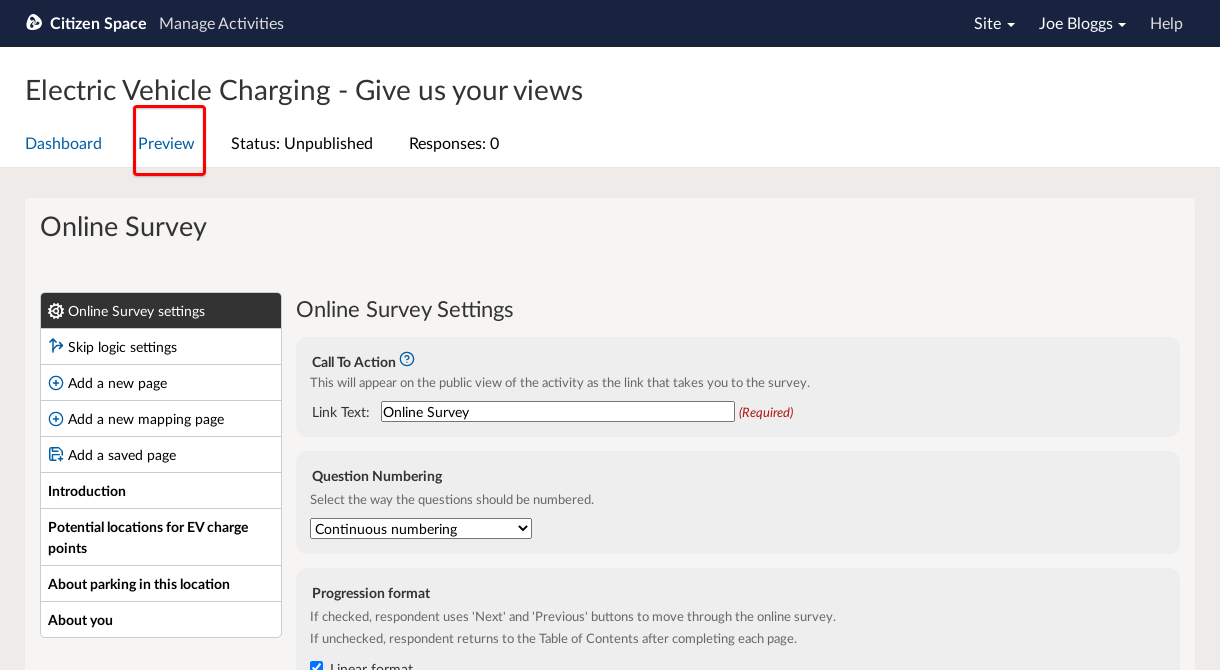
Pages, Questions and Answer Components
In Citizen Space, a form, survey or event registration activity is made up of pages. Each page can contain a number of questions, and each question can contain a number of answer components.

To visualise that in practice, below is a Citizen Space activity 'front end' (the bit your public users will access).

Adding a page
Understanding the Citizen Space activity structure makes it easier to get to grips with building your activity.
As already mentioned, your form, survey or event registration activity will already have a Page 1 (or Contact information page). This page is included by default in each new activity but you can change everything about this page or delete altogether if you wish to.
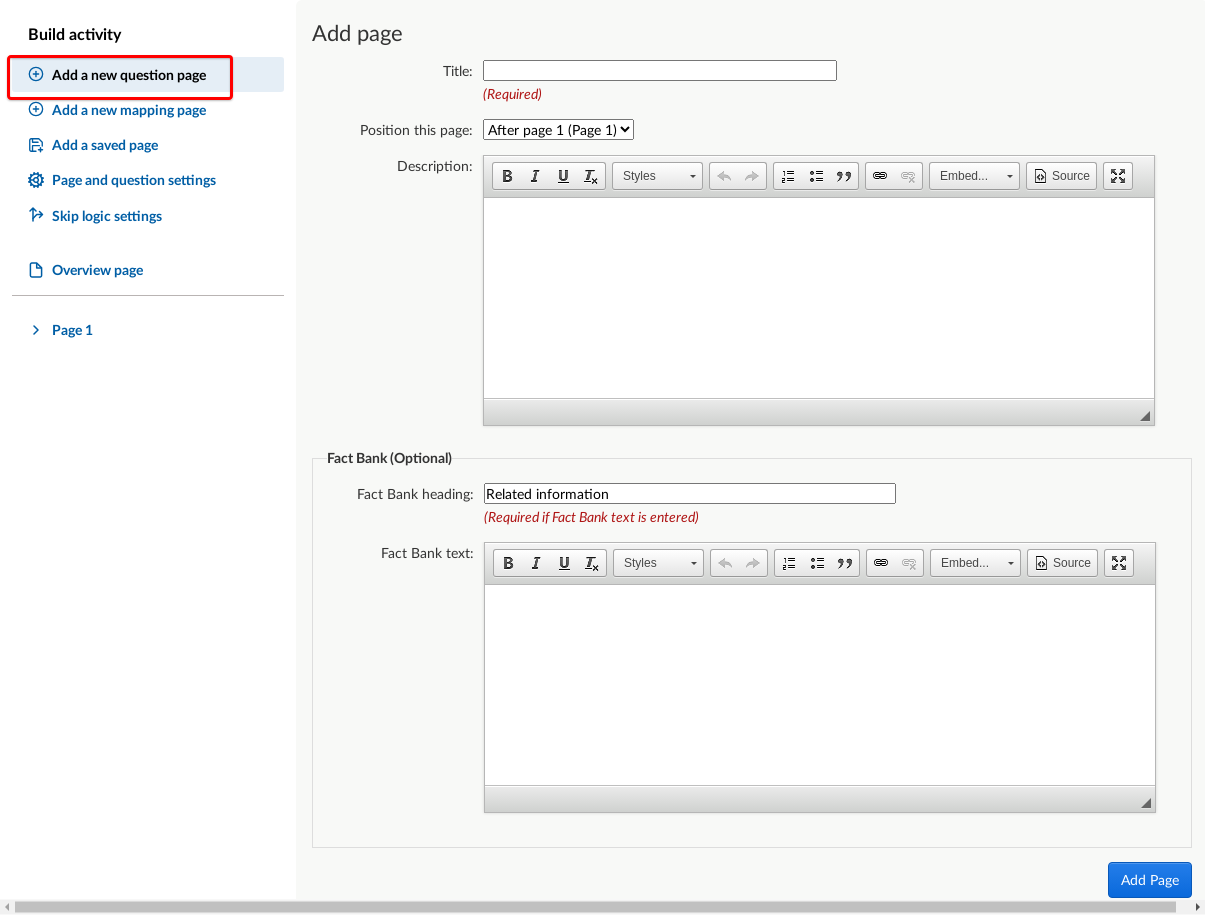
For now, select the first option from the sidebar menu, Add a new question page. This will take you to the Add page screen.
On the Add page screen, enter a title and any extra information you want to the page description or Fact Bank sections, then select the blue Add Page button.
Adding a question
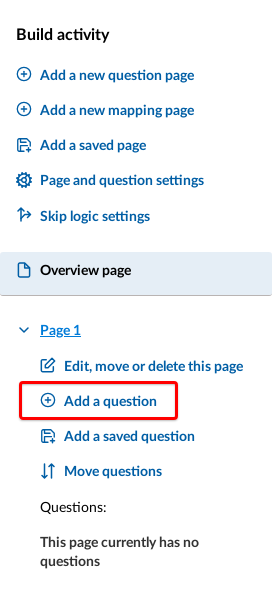
Now we have a nice new question page. Unfortunately it doesn't contain any questions yet! In the sidebar, the title of your new page should now appear below Page 1, with its own sub-menu of options. Select the second of these sub-menu options, Add a question. (This sidebar lets you quickly navigate all of your questions and pages – once we've added them!)
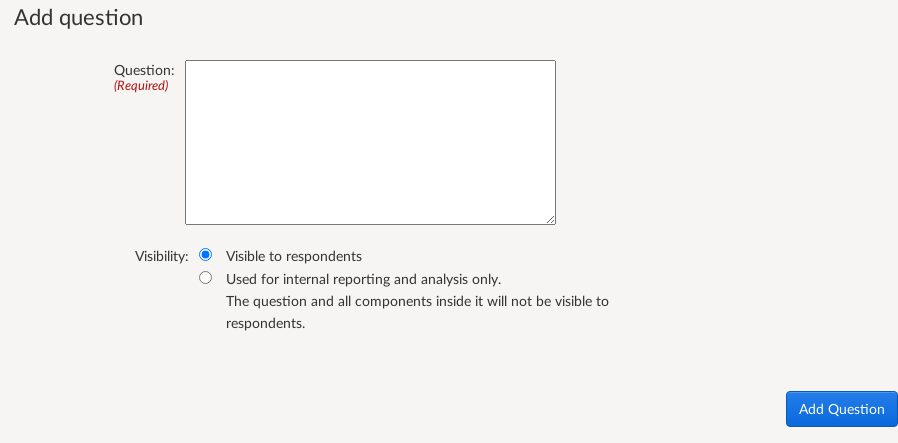
On the Add question screen, enter the text of your question. Don't worry about answers, extra information or anything else at this stage: the question text is all that's required now. Then select the blue Add Question button.
Questions, questions!
What are the 3 'magic questions' and why should I think twice about deleting them?!
What does the 'Is this question used for reporting and analysis only?' checkbox mean?
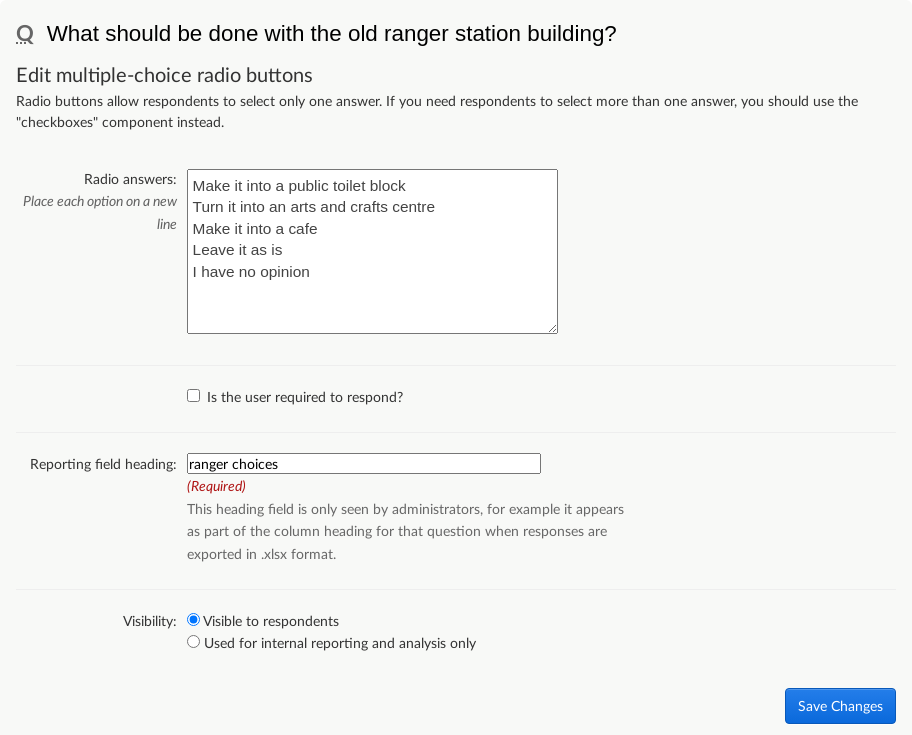
Adding answer components
Now that we've got a question, we need some way for people to answer it! Let's add an answer component. As you can tell from the Answer Components dropdown menu, there are a number of different components to choose from.
Don't worry at this stage if you're not sure which type of answer component you want. You'll have access to a preview of each component when you select it from the dropdown list. (You will probably also want to familiarise yourself with all of the different components, and this Knowledge Base article is a great place to start doing that.)
When you have identified the appropriate answer component for your question, select it and then the Add Answer Component button.

Fill out the various options for your chosen answer component (each component type will have a slightly different set of fields). You will be required to add a Reporting field heading. This is the text label that is used to identify each individual answer component in your exports and reports and elsewhere in the admin side of Citizen Space. It won't ever be visible on the public activity. As a rule reporting field headings should be clear, concise, consistent and unique. Once that is done, select the blue Add Component button. Congratulations, you have just added your first question! This activity is really shaping up.
More about answer components
What are the different answer components?
How do I include more than one answer component to a question?
Repeat as required
Preparing for preview
You've now gone through all the essential steps for creating the core elements of your activity. To complete your activity, simply add as many more pages, questions and answer components as are necessary.
As you do, they will appear in the sidebar of your Activity build screen. From here, you can quickly navigate to, edit, move or delete any part of your activity.
Preview, preview, preview
At any point, you can preview your work to check the public-facing aspect of your activity. As mentioned earlier, the Preview widget is always accessible from the activity navigation bar. We highly recommend you use this frequently before publishing anything!
Use Preview mode to make sure that the flow of your activity is working as you expect it to, that the questions are set up correctly, that any extra information is displaying as intended, and so on.
If at any point you spot something you would like to change, just select Leave Preview from the Preview navigation bar to return to the admin interface. You can make the amendments you need and then return to preview mode to double-check them.

Learn to love Preview mode!
Preview options
Want someone else to have a look and check your work? Learn about sharing preview links.
A little about activity structure
In Citizen Space, you can choose from one of three activity structures, linear (the default), non-linear, or linear with skip logic. Which structure you choose will depend on a few things, including activity length and content. As mentioned above, you'll find these options under the Page and question settings of the Build activity sidebar menu.
Which structure should you choose? Linear vs. non-linear activity structure
From one quick start guide to another - Skip logic: a quick start guide
Publish!
When you're sure that you're happy with your activity, you are ready to publish. Return to the Activity Dashboard, and select on the pale blue Draft widget to access the green Publish widget. Once you have published, the pale blue Draft widget will change to bright green Published widget. Congratulations, you just published your first activity in Citizen Space!


If, for any reason, you need to unpublish your activity (for examples, to edit some of the content), just select the green Published widget and select the red Retract button . This will take you to a screen where you can customise the Activity offline message if you wish and then confirm the retraction of the activity. When you are ready, simply publish again to get your activity back online.
But hopefully all is well, and your work is now accessible on the public side of your Citizen Space.
The URL of your activity is accessible via the Link icon in the activity navigation bar, and you can share this to start inviting participation. Sit back and watch the responses come flooding in. Good job!
Publishing problems? If you're having trouble setting an activity live, check the steps here first.
Continue to build your skills with Delib Learn Delib Learn is the place to be should you wish to find out more about live and on demand webinars, and other training opportunities (opens in new tab).